Screenshots are an essential tool for communication, troubleshooting, and documentation. Whether you’re capturing an error message, saving a webpage, or sharing an image, knowing how to take a screenshot on your Dell PC or laptop can save time and effort.
This guide covers four built-in Windows methods to take screenshots on Dell laptops and desktops, ensuring you don’t need any third-party software.
How to Take a Screenshot on a Dell PC or Laptop
Dell computers running Windows offer multiple ways to capture screenshots, including:
- Windows + Print Screen Shortcut – Quick full-screen capture with auto-save.
- Snipping Tool – Built-in tool for selecting specific areas of the screen.
- Snip & Sketch – Flexible screenshot tool with annotation and sharing options.
- Alt + Print Screen – Captures only the active window.
Each method has its advantages. Let’s dive into the step-by-step instructions.
1. Take a Screenshot with Windows + Print Screen (Fastest Method)
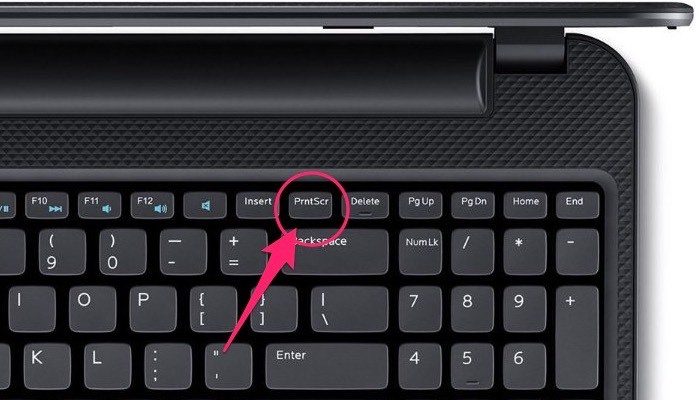
The Windows + Print Screen (PrtScn) shortcut is the simplest way to take a full-screen screenshot on a Dell PC. It automatically saves the screenshot to your computer, so you don’t have to paste it manually.
How to Take a Screenshot with Windows + Print Screen
- Press
Windows Key + PrtScnat the same time. - The screen will briefly dim, indicating that the screenshot has been captured.
- The screenshot is automatically saved in:
📂 File Explorer > Pictures > Screenshots
💡 Pro Tip: If the PrtScn key doesn’t work, try Fn + PrtScn (some Dell laptops require this).
2. Take a Screenshot Using the Snipping Tool (For Custom Screenshots)
The Snipping Tool is a built-in Windows app that lets you capture specific parts of your screen instead of the entire display. This is great for taking precise screenshots without extra cropping.
How to Use the Snipping Tool
- Open Start Menu, type Snipping Tool, and click to open it.
- Click New and choose a snip mode:
- Rectangular Snip – Select a rectangular portion.
- Free-form Snip – Draw around the area you want.
- Window Snip – Capture a specific app window.
- Full-screen Snip – Capture the entire screen.
- Edit or annotate the screenshot using the built-in tools.
- Save the screenshot by clicking File > Save As and choosing a folder.
💡 Pro Tip: Pin the Snipping Tool to your taskbar for quick access.
3. Take a Screenshot Using Snip & Sketch (Best for Editing & Sharing)
Snip & Sketch (replacing the Snipping Tool in Windows 11) is a more advanced screenshot tool that allows you to edit and share screenshots easily.
How to Use Snip & Sketch
- Press
Windows + Shift + S - The screen dims, and a toolbar appears with four options:
- Rectangular Snip
- Freeform Snip
- Window Snip
- Full-screen Snip
- The screenshot is copied to your clipboard (not automatically saved).
- Click the notification pop-up to open Snip & Sketch.
- Edit, annotate, or share the screenshot.
💡 Pro Tip: If you forget to save a Snip & Sketch screenshot, paste it into Paint or Word to recover it.
4. Take a Screenshot of an Active Window (Alt + Print Screen)
If you only want to capture the active window instead of the entire screen, Alt + Print Screen is the best shortcut.
How to Screenshot an Active Window
- Click on the window you want to capture.
- Press Alt + PrtScn (or Fn + Alt + PrtScn on some Dell laptops).
- Open Paint, Word, or any image editor and paste the screenshot (Ctrl + V).
- Save the screenshot as a file.
💡 Pro Tip: Combine this shortcut with Snip & Sketch for quick editing and annotations.
Comparison Table: Best Screenshot Methods for Dell PCs
| Method | Shortcut | Features | Ease of Use |
|---|---|---|---|
| Windows + PrtScn | Win + PrtScn | Captures entire screen, auto-saves | ⭐⭐⭐⭐⭐ |
| Snipping Tool | None | Select custom area, manual save | ⭐⭐⭐⭐ |
| Snip & Sketch | Win + Shift + S | Select custom area, edit & share | ⭐⭐⭐⭐ |
| Alt + PrtScn | Alt + PrtScn | Captures active window only | ⭐⭐⭐ |
FAQs:
Where are my screenshots saved on a Dell PC?
- Windows + PrtScn screenshots are saved in: Pictures > Screenshots
- Snipping Tool & Snip & Sketch screenshots must be saved manually.
How do I screenshot only one window on a Dell laptop?
- Press
Alt + PrtScn– Captures only the active window. - Use Snipping Tool or Snip & Sketch for custom selections.
Why isn’t my PrtScn key working?
- Try Fn + PrtScn (common on Dell laptops).
- Use Windows + Shift + S as an alternative.
Taking a screenshot on a Dell PC is easy once you know the right shortcuts and tools.
🔹 Best for Quick Screenshots? Windows + PrtScn – Simple & automatic.
🔹 Best for Custom Screenshots? Snipping Tool – Precise selection.
🔹 Best for Editing & Sharing? Snip & Sketch – Flexible & annotation-friendly.
🔹 Best for Capturing a Single Window? Alt + PrtScn – No extra cropping needed.
Choose the method that fits your needs and start taking screenshots like a pro!


Leave a Reply